Kai Boer F9 how to brush machine, open Boer F9 how to brush machine? As a high-definition audio and video enthusiast, if you do not know the commonly used Brush tutorial, then you OUT, the following author will share the hungry open Boer F9 commonly used brush machine. 
Kai Bor F9 line brush tutorial
1, first download the Brush Toolkit and firmware package, and then extract, two folders, a USB driver, and the other is the Brush tool;
(Brush machine kit download address, http://pan.baidu.com/s/1CKIbc)
(firmware update download address, http://pan.baidu.com/s/1hqBS7ac;
2.0.8 beta download address, http://pan.baidu.com/s/1eQ5PjgA)
2, with a dual USB cable, one access to open Boer F9 USB port, the other end into the computer USB port;
3, with a toothpick and other sharp objects hold down the RESET hole next to the F9 fiber interface, and then turn on the power, about 10 seconds, the computer will pop up a new device, according to prompts from the local designated location to install the extracted USB driver;
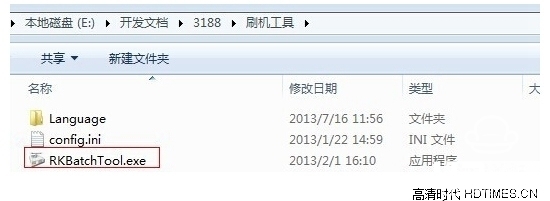
4, after the driver is installed, open the RKBatchTool.exe inside the Brush Tool.
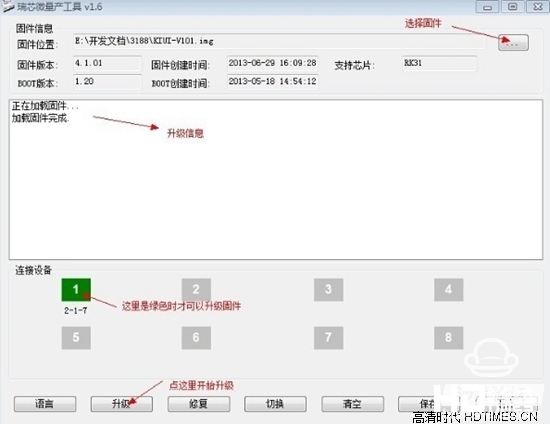
5, open the Brush tool, and then click the button in the upper right corner to select the location of the firmware IMG file, and then point to upgrade! The box in the lower left corner of the figure should be green. If it is not green, please re-plug the computer USB again or repeat the operation before holding down the RESET key.
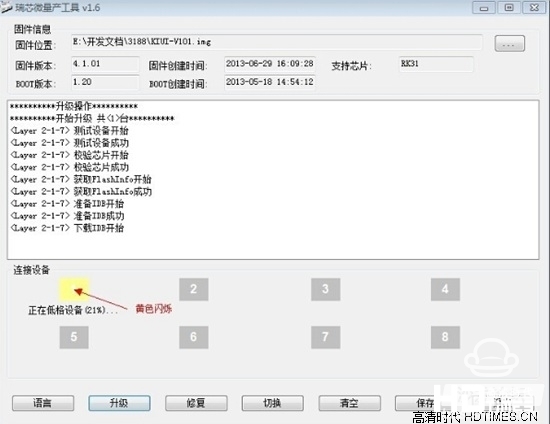
6. At this time, the yellow flashing of the block begins to flash, and it can be completed in a moment;
Note: If the brush fails, it does not matter, you can operate it again, rest assured, never brush dead.
Open Bor F9 card brush tutorial
1, first download the upgrade firmware, do not extract directly copied to the U disk root directory;
2, before the upgrade is best to double clear or restore the factory value, Shuangqing system, please see the following tutorial;
The first step: first open the Bol F9 is the power-off state, then find a toothpick to withstand the RESET button, and finally turn on the power supply! Until the interface of the player appears on the recovery interface, release the RESET button;
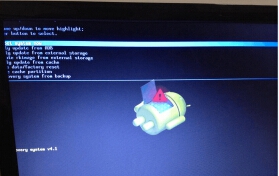
Recovery interface
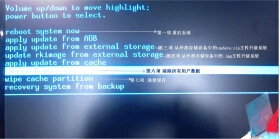
The third last item
The second step: to prepare the first step, select the sixth item, which is the last third item (with the remote control or mouse control), press the OK button to select;
The third step: After the interface appears, select "delete all user date" to complete the first step;
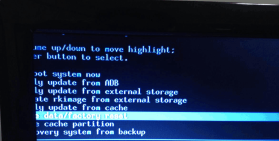
Delete all user date

Step 4: After the selection, it will automatically return to the recovery interface homepage;
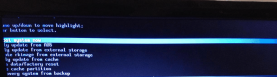
Return to the recovery interface
Step 5: After you adjust to the second last item;
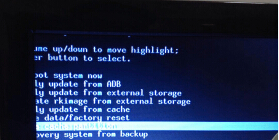
The second to last item
Step 6: Click the OK button. After the cleanup is complete, the system will automatically restart to enter the main page of the player.
3. After the Shuangqing enters the system, insert the U disk with the firmware into the box. Later, the system will prompt to discover the new firmware, and confirm that the system waits for the system to write the flash file.
4. After the system writes the flash file, it will prompt again whether to upgrade. After the confirmation, the system will automatically restart to enter the status of the flashing machine.
5. The first time the upgrade is completed is relatively slow, please be patient and wait a lot faster.
6, after entering the system desktop, you must first set up a network connection, then download and install "installed wizard", so Bo TV, Bo film and other common software will have;
Looked at the open Boer F9 line brush and card brush tutorial provided above, presumably you can not wait to try to brush it, then hurry up and act.
Kai Bor F9 line brush tutorial
1, first download the Brush Toolkit and firmware package, and then extract, two folders, a USB driver, and the other is the Brush tool;
(Brush machine kit download address, http://pan.baidu.com/s/1CKIbc)
(firmware update download address, http://pan.baidu.com/s/1hqBS7ac;
2.0.8 beta download address, http://pan.baidu.com/s/1eQ5PjgA)
2, with a dual USB cable, one access to open Boer F9 USB port, the other end into the computer USB port;
3, with a toothpick and other sharp objects hold down the RESET hole next to the F9 fiber interface, and then turn on the power, about 10 seconds, the computer will pop up a new device, according to prompts from the local designated location to install the extracted USB driver;
4, after the driver is installed, open the RKBatchTool.exe inside the Brush Tool.
5, open the Brush tool, and then click the button in the upper right corner to select the location of the firmware IMG file, and then point to upgrade! The box in the lower left corner of the figure should be green. If it is not green, please re-plug the computer USB again or repeat the operation before holding down the RESET key.
6. At this time, the yellow flashing of the block begins to flash, and it can be completed in a moment;
Note: If the brush fails, it does not matter, you can operate it again, rest assured, never brush dead.
Open Bor F9 card brush tutorial
1, first download the upgrade firmware, do not extract directly copied to the U disk root directory;
2, before the upgrade is best to double clear or restore the factory value, Shuangqing system, please see the following tutorial;
The first step: first open the Bol F9 is the power-off state, then find a toothpick to withstand the RESET button, and finally turn on the power supply! Until the interface of the player appears on the recovery interface, release the RESET button;
Recovery interface
The third last item
The second step: to prepare the first step, select the sixth item, which is the last third item (with the remote control or mouse control), press the OK button to select;
The third step: After the interface appears, select "delete all user date" to complete the first step;
Delete all user date
Step 4: After the selection, it will automatically return to the recovery interface homepage;
Return to the recovery interface
Step 5: After you adjust to the second last item;
The second to last item
Step 6: Click the OK button. After the cleanup is complete, the system will automatically restart to enter the main page of the player.
3. After the Shuangqing enters the system, insert the U disk with the firmware into the box. Later, the system will prompt to discover the new firmware, and confirm that the system waits for the system to write the flash file.
4. After the system writes the flash file, it will prompt again whether to upgrade. After the confirmation, the system will automatically restart to enter the status of the flashing machine.
5. The first time the upgrade is completed is relatively slow, please be patient and wait a lot faster.
6, after entering the system desktop, you must first set up a network connection, then download and install "installed wizard", so Bo TV, Bo film and other common software will have;
Looked at the open Boer F9 line brush and card brush tutorial provided above, presumably you can not wait to try to brush it, then hurry up and act.